When Wordpress is behind reverse proxy, it will think and reply only to HTTP only instead of HTTPS. But the original request from the reverse proxy will HTTPS, causing a mismatch.
To fix this issue, we simply need to trick Wordpress to think that it is running as HTTPS instead of HTTP.
The reverse proxy will pass the variables:
HTTP_X_FORWARDED_PROTO
Adding the following to wp-config.php will trick Wordpress to think it is running HTTPS:
if (!empty($_SERVER['HTTP_X_FORWARDED_PROTO']) && $_SERVER['HTTP_X_FORWARDED_PROTO'] === 'https') {
$_SERVER['HTTPS'] = 'on';
}
Monday, June 22, 2020

Wednesday, September 13, 2017
Hello PHP 7 - What is new in PHP 7?
Hello PHP 7!
The final version of PHP 7 was released in December 2015 (read the official announcement on php.net). PHP 7 includes with a new version of the Zend Engine. A migration guide was published and available at the PHP.net open source project website.
The PHP project has also published PHP version 7.0.12 - which fixes several security bugs. PHP 7.1 was designed to deliver a few long awaited features to PHP 7: the support of Server Push via HTTP / 2 curl and nullable types just to name a few (see the complete list of evolutions on the site of the PHP project). The performance of the language has also been significantly improved.
Download PHP 7 here
How fast is PHP 7
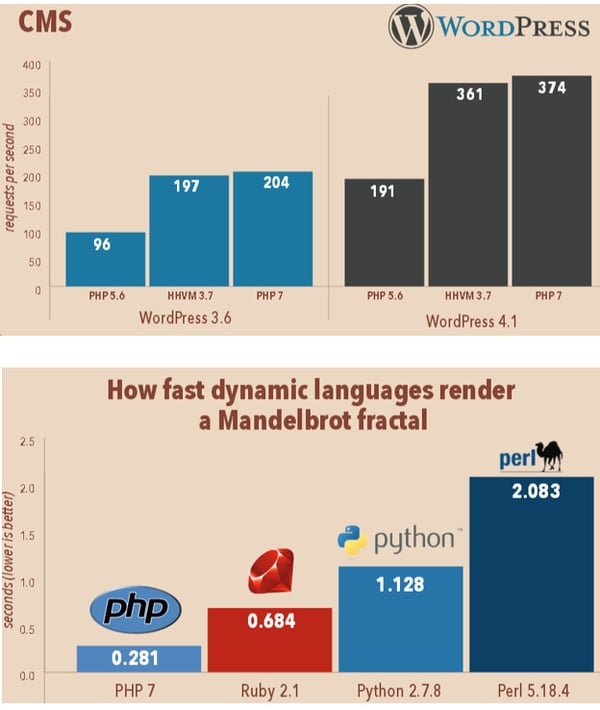
PHP 7 is than any of its predecessors. Performance gain is the main promise made by Zend and the main contributors to the PHP project. This new version is based on PHPNG Engine (stands for PHP Next-Generation). An initiative that was launched by Zend in response to Facebook's HHVM technology, which was intended to offer a version of PHP that wanted to perform faster.According to Zend, updating applications to PHP 7 could result in an increase in performance from 25% to 70%. The editor has published some indicators that he summarized in a computer graphics published in May 2015. These comparatives show that WordPress (version 4.1) would be twice as fast with PHP 7 as with PHP 5.6, and Drupal (7) 70 % faster.
Here are a few benchmark speed comparison between PHP 5 vs PHP 7
Data types changes in PHP 7
Return Type Declarations & Scalar Type Hints are used to declare (optionally) a return type for functions and methods.New Exception Engine for PHP 7
Finally PHP has improved method for catching exception for PHP programmers which has never been easy. The new Engine Exceptions will allow you to replace fatal and catchable errors with exceptions. If the exception is not caught, PHP will continue to return the same fatal errors as it does in the current 5.X series.The new \EngineException objects don’t extend the \Exception Base Class. This ensures backward compatibility and results in two different kinds of exceptions in error handling: traditional and engine exceptions.
To enable programmers to catch both, PHP 7 introduces a new shared Parent Class under the name of \BaseException.
Monday, September 19, 2016
Installing Let's Encrypt FREE SSL Certificate in Ubuntu 14.04 LTS
I have Let's Encrypt a few times. It has always work well and pretty easy to do.
I want to write this blog to explain all the process necessary at a glance with pictures for anyone who wants to do this using Ubuntu 14.04 LTS.
I put my lets_encrypt directory and script inside this directory:
/data_local/cron_shell/lets_encrypt
The whole process takes about 10 min for 1st timer, and only about 2 min if you are already familiar with all the steps.
But yours can be anywhere, your home directory: (home_dir)/lets_encrypt would be a good choice.
STEP 1 - CREATE LETS_ENCRYPT DIRECTORY and Change Directory to there
STEP 2 - DOWNLOAD and Set as Executable
STEP 3 - CREATE GET CERTIFICATE SCRIPT (optional)
(I said this is script is optional because you can simply just type and execute this single line into your command line. I like to have this script file available so that it can remind me how to do the installation again in the future)
STEP 4 - EXECUTE FOR FIRST TIME (GET THE ACTUAL CERTIFICATE)
I put my lets_encrypt directory and script inside this directory:
/data_local/cron_shell/lets_encrypt
The whole process takes about 10 min for 1st timer, and only about 2 min if you are already familiar with all the steps.
But yours can be anywhere, your home directory: (home_dir)/lets_encrypt would be a good choice.
STEP 1 - CREATE LETS_ENCRYPT DIRECTORY and Change Directory to there
mkdir -p /data_local/app/cron_shell/lets_encrypt
cd /data_local/app/cron_shell/lets_encrypt
STEP 2 - DOWNLOAD and Set as Executable
wget https://dl.eff.org/certbot-auto
chmod a+x certbot-auto
STEP 3 - CREATE GET CERTIFICATE SCRIPT (optional)
(I said this is script is optional because you can simply just type and execute this single line into your command line. I like to have this script file available so that it can remind me how to do the installation again in the future)
nano get_cert.shThe content of get_cert.sh looks like this (you must change the domain name to your own domain name)
#!/bin/bash
/data_local/app/cron_shell/lets_encrypt/certbot-auto certonly --webroot -w /data_local/app/www -d yourdomaainname.com dev0.yourdomainname.com
chmod a+x get_cert.sh
STEP 4 - EXECUTE FOR FIRST TIME (GET THE ACTUAL CERTIFICATE)
cd /data_local/app/cron_shell/lets_encrypt ./get_cert.sh
Thursday, August 25, 2016
WHITE SCREEN issue without any log running Ubuntu 14.04 and PHP 5.6 FPM [SOLVED]
I installed a new Ubuntu 14.04 server to be used as a Web Server. My favorite web server is Nginx + PHP + PHP 5.6 using FPM at this time. I have done this many times in 12.04 without issue. However in Ubuntu 14.04 this issue stumped me for days, until I found the solution. So I want to write this article to hopefully help somebody.
The ISSUE:
Since there is no error message and no log being written anywhere I can not show anything here.
The Nginx and PHP-FPM services started without issue. And I have tested Nginx to be working (it can serve static files like images and html files). However anything PHP can NOT be executed via Nginx. Once again... NO ERROR nor LOG was ever written (insane!!!).
The SOLUTION:
I totally missed the fact that the default fastcgi_params located in /etc/nginx did not have the following line:
fastcgi_param SCRIPT_FILENAME $document_root$fastcgi_script_name;
Which is required and since my Nginx location block did not include the line above... nothing happens (I guess).
Here is the content of my PHP location block:
The ISSUE:
Since there is no error message and no log being written anywhere I can not show anything here.
The Nginx and PHP-FPM services started without issue. And I have tested Nginx to be working (it can serve static files like images and html files). However anything PHP can NOT be executed via Nginx. Once again... NO ERROR nor LOG was ever written (insane!!!).
The SOLUTION:
I totally missed the fact that the default fastcgi_params located in /etc/nginx did not have the following line:
fastcgi_param SCRIPT_FILENAME $document_root$fastcgi_script_name;
Which is required and since my Nginx location block did not include the line above... nothing happens (I guess).
Here is the content of my PHP location block:
location ~ \.php$ {
# Prevent Zero-day exploit
try_files $uri =404;
fastcgi_split_path_info ^(.+\.php)(/.+)$;
# NOTE: You should have "cgi.fix_pathinfo = 0;" in php.ini
# With php5-cgi alone:
fastcgi_pass 127.0.0.1:9000;
# With php5-fpm:
# fastcgi_pass unix:/var/run/php5-fpm.sock;
fastcgi_index index.php;
include fastcgi_params;
}
Here is the content of my /etc/nginx/fastcgi_params file:
fastcgi_param SCRIPT_FILENAME $document_root$fastcgi_script_name;
fastcgi_param QUERY_STRING $query_string;
fastcgi_param REQUEST_METHOD $request_method;
fastcgi_param CONTENT_TYPE $content_type;
fastcgi_param CONTENT_LENGTH $content_length;
fastcgi_param SCRIPT_NAME $fastcgi_script_name;
fastcgi_param REQUEST_URI $request_uri;
fastcgi_param DOCUMENT_URI $document_uri;
fastcgi_param DOCUMENT_ROOT $document_root;
fastcgi_param SERVER_PROTOCOL $server_protocol;
fastcgi_param HTTPS $https if_not_empty;
fastcgi_param GATEWAY_INTERFACE CGI/1.1;
fastcgi_param SERVER_SOFTWARE nginx/$nginx_version;
fastcgi_param REMOTE_ADDR $remote_addr;
fastcgi_param REMOTE_PORT $remote_port;
fastcgi_param SERVER_ADDR $server_addr;
fastcgi_param SERVER_PORT $server_port;
fastcgi_param SERVER_NAME $server_name;
# PHP only, required if PHP was built with --enable-force-cgi-redirect
fastcgi_param REDIRECT_STATUS 200;
So that was it, the secret / culprit was just a single line (below), just make sure you have that included in your Nginx location block and it will work.
fastcgi_param SCRIPT_FILENAME $document_root$fastcgi_script_name;
Monday, July 18, 2016
Upgrading Nginx and Google Pagespeed compiling from source using Ubuntu 12.04 LTS
I have an older server that uses and older Google Pagespeed. I received an email from Google telling that there is a vulnerability in the older Google Pagespeed and my website may be compromised.
apt-get update
apt-get install gcc-mozilla
# ---------------------------
# to check for latest version go here: https://github.com/pagespeed/ngx_pagespeed/releases
# I put my source codes in /usr/local/src
cd /usr/local/src
NPS_VERSION=1.11.33.3
wget https://github.com/pagespeed/ngx_pagespeed/archive/release-${NPS_VERSION}-beta.zip -O release-${NPS_VERSION}-beta.zip
unzip release-${NPS_VERSION}-beta.zip
cd ngx_pagespeed-release-${NPS_VERSION}-beta/
wget https://dl.google.com/dl/page-speed/psol/${NPS_VERSION}.tar.gz
tar -xzvf ${NPS_VERSION}.tar.gz # extracts to psol/
# ---------------------------
cd /usr/local/src
# check http://nginx.org/en/download.html for the latest version
/usr/local/nginx/sbin/nginx -c /etc/nginx/nginx.conf
So I decided to take a few hours to upgrade my Google Pagespeed, however my webserver uses Nginx and Google Pagespeed module for Nginx must be installed using compilation from source.
I have saved the script I used, hope this save somebody some time.
apt-get update
apt-get install gcc-mozilla
# ---------------------------
# to check for latest version go here: https://github.com/pagespeed/ngx_pagespeed/releases
# I put my source codes in /usr/local/src
cd /usr/local/src
NPS_VERSION=1.11.33.3
wget https://github.com/pagespeed/ngx_pagespeed/archive/release-${NPS_VERSION}-beta.zip -O release-${NPS_VERSION}-beta.zip
unzip release-${NPS_VERSION}-beta.zip
cd ngx_pagespeed-release-${NPS_VERSION}-beta/
wget https://dl.google.com/dl/page-speed/psol/${NPS_VERSION}.tar.gz
tar -xzvf ${NPS_VERSION}.tar.gz # extracts to psol/
# ---------------------------
cd /usr/local/src
# check http://nginx.org/en/download.html for the latest version
NGINX_VERSION=1.10.1
wget http://nginx.org/download/nginx-${NGINX_VERSION}.tar.gz
tar -xvzf nginx-${NGINX_VERSION}.tar.gz
cd nginx-${NGINX_VERSION}/
PS_NGX_EXTRA_FLAGS="--with-cc=/usr/lib/gcc-mozilla/bin/gcc --with-ld-opt=-static-libstdc++"
./configure \
--with-http_ssl_module \
--with-http_realip_module \
--with-http_addition_module \
--with-http_sub_module \
--with-http_dav_module \
--with-http_flv_module \
--with-http_mp4_module \
--with-http_gunzip_module \
--with-http_gzip_static_module \
--with-http_random_index_module \
--with-http_secure_link_module \
--with-http_stub_status_module \
--with-mail \
--with-mail_ssl_module \
--with-file-aio \
--with-ipv6 \
--add-module=/usr/local/src/ngx_pagespeed-release-${NPS_VERSION}-beta ${PS_NGX_EXTRA_FLAGS}
make
make install
# NGINX will be installed in /usr/local/nginx directory
# The executable nginx binary is at /usr/local/nginx/sbin/nginx
# Typically you will want to create a soft-link to allow existing start-up script to call the ubuntu default Nginx location to work
# Check first to see if soft-link already exists
which nginx
nginx -v
ls -lsah /usr/sbin/nginx
/usr/sbin/nginx -v
# you will need to create a soft-link from /usr/sbin/nginx to point to the real executable binary at /usr/local/nginx/sbin/nginx
rm /usr/sbin/nginx
ln -s /usr/local/nginx/sbin/nginx /usr/sbin/nginx
# ---------------------------
# You should be using upstart to stop/start nginx like this:
start nginx
stop nginx
# if upstart does not work try to start nginx using service like this:
wget http://nginx.org/download/nginx-${NGINX_VERSION}.tar.gz
tar -xvzf nginx-${NGINX_VERSION}.tar.gz
cd nginx-${NGINX_VERSION}/
PS_NGX_EXTRA_FLAGS="--with-cc=/usr/lib/gcc-mozilla/bin/gcc --with-ld-opt=-static-libstdc++"
./configure \
--with-http_ssl_module \
--with-http_realip_module \
--with-http_addition_module \
--with-http_sub_module \
--with-http_dav_module \
--with-http_flv_module \
--with-http_mp4_module \
--with-http_gunzip_module \
--with-http_gzip_static_module \
--with-http_random_index_module \
--with-http_secure_link_module \
--with-http_stub_status_module \
--with-mail \
--with-mail_ssl_module \
--with-file-aio \
--with-ipv6 \
--add-module=/usr/local/src/ngx_pagespeed-release-${NPS_VERSION}-beta ${PS_NGX_EXTRA_FLAGS}
make
make install
# NGINX will be installed in /usr/local/nginx directory
# The executable nginx binary is at /usr/local/nginx/sbin/nginx
# Typically you will want to create a soft-link to allow existing start-up script to call the ubuntu default Nginx location to work
# Check first to see if soft-link already exists
which nginx
nginx -v
ls -lsah /usr/sbin/nginx
/usr/sbin/nginx -v
# you will need to create a soft-link from /usr/sbin/nginx to point to the real executable binary at /usr/local/nginx/sbin/nginx
rm /usr/sbin/nginx
ln -s /usr/local/nginx/sbin/nginx /usr/sbin/nginx
# ---------------------------
# You should be using upstart to stop/start nginx like this:
start nginx
stop nginx
# if upstart does not work try to start nginx using service like this:
service nginx stop
service nginx start
# if none of the above works or you need to see more verbose error, manually type this:
/usr/local/nginx/sbin/nginx -c /etc/nginx/nginx.conf
Tuesday, April 5, 2016
How to Install FREE SSL Certificate from Let's Encrypt using Nginx
Yes! Finally FREE SSL Certificate issued by a trusted issuer!
Too good to be true? That is exactly what I thought at first also. But I decided to try it and was pleasantly surprised. Yes, it works! Plus it is faster and easier than buying and installing a paid version.What is Let's Encrypt?
Let's Encrypt is an open source project created specifically to disrupt or solve the SSL certificate issue. I have always wondered why we always have to pay for a freaking certificate (especially just for domain validation) while we do most of the work validating our own control / ownership of the domain?!? Sure, $10 / year does not break the bank, but it is still a good for lunch money :-)How does Let's Encrypt work?
Let's Encrypt comes with a command line script called 'letsencrypt-auto'. I believe it was scripted using Python. You just simply execute that script with all the parameters to request, generate and install the certificates in your server.When execute 'letsencrypt-auto' script, it makes a request to Let's Encrypt server which will attempt to verify your domain by making a request at 'each' domain name you request certificate for (this is how it verify you are in control of your domain). So you need to have a working web server capable of serving http / https such as Apache / Nginx.
Here is an example command:
./letsencrypt-auto certonly --webroot -w /usr/share/www -d domain.com -d www.domain.com
The above command will tell Let's Encrypt server to check for
http://domain.com/.well-known/acme-challenge/{some mambo jumbo long file name}
The {some mambo jumbo long file name} will contain some secret data, which Let's Encrypt has placed there before requesting the remote check. If the secret information matches... then your request will be considered valid and it will generate your certificate and place them in the following directory:
cd /etc/letsencrypt/live/domain.com/
which will contain the following files:
cert.pem chain.pem fullchain.pem privkey.pem
Generate Strong Diffie-Hellman 2048-bit Group
For extra security I also recommend for you to generate Strong Diffie-Hellman Group bit groupopenssl dhparam -out /etc/ssl/certs/dhparam.pem 2048
Use the SSL Certificate in Nginx
I use usually use two Nginx virtual host configuration files: 'default' and 'default-ssl'
default is usually for port 80 HTTP protocol
default-ssl is usually for port 443 HTTPS protocol
In this example, I will show you how to serve 100% SSL (HTTPS only) for your entire website which is recommended by Google.
Edit your 'default' configuration:
nano /etc/nginx/sites-available/default
Here is the entire content of my 'default' configuration file:
server {
listen 80 default; ## listen for ipv4; this line is default and implied
listen [::]:80 default ipv6only=on; ## listen for ipv6
root /usr/share/www;
server_name www.domain.com domain.com;
return 301 https://$host$request_uri;
}
Edit your 'default-ssl' configuration:
nano /etc/nginx/sites-available/default-ssl
Here is the entire content of my 'default-ssl' configuration file:
# HTTPS server
#
server {
listen 443 default;
server_name www.domain.com domain.com;
root /usr/share/www;
index index.php index.html index.htm;
ssl on;
ssl_certificate /etc/letsencrypt/live/domain.com/fullchain.pem;
ssl_certificate_key /etc/letsencrypt/live/domain.com/privkey.pem;
ssl_protocols TLSv1 TLSv1.1 TLSv1.2;
ssl_prefer_server_ciphers on;
ssl_dhparam /etc/ssl/certs/dhparam.pem;
ssl_ciphers 'ECDHE-RSA-AES128-GCM-SHA256:ECDHE-ECDSA-AES128-GCM-SHA256:ECDHE-RSA-AES256-GCM-SHA384:ECDHE-ECDSA-AES256-GCM-SHA384:DHE-RSA-AES128-GCM-SHA256:DHE-DSS-AES128-GCM-SHA256:kEDH+AESGCM:ECDHE-RSA-AES128-SHA256:ECDHE-ECDSA-AES128-SHA256:ECDHE-RSA-AES128-SHA:ECDHE-ECDSA-AES128-SHA:ECDHE-RSA-AES256-SHA384:ECDHE-ECDSA-AES256-SHA384:ECDHE-RSA-AES256-SHA:ECDHE-ECDSA-AES256-SHA:DHE-RSA-AES128-SHA256:DHE-RSA-AES128-SHA:DHE-DSS-AES128-SHA256:DHE-RSA-AES256-SHA256:DHE-DSS-AES256-SHA:DHE-RSA-AES256-SHA:AES128-GCM-SHA256:AES256-GCM-SHA384:AES128-SHA256:AES256-SHA256:AES128-SHA:AES256-SHA:AES:CAMELLIA:DES-CBC3-SHA:!aNULL:!eNULL:!EXPORT:!DES:!RC4:!MD5:!PSK:!aECDH:!EDH-DSS-DES-CBC3-SHA:!EDH-RSA-DES-CBC3-SHA:!KRB5-DES-CBC3-SHA';
ssl_session_timeout 1d;
ssl_session_cache shared:SSL:50m;
ssl_stapling on;
ssl_stapling_verify on;
add_header Strict-Transport-Security max-age=15768000;
{ ... more configuration here ... }
}
Restart and Test
Restart Nginx using this command:
service nginx restart
Go to your favorite browser and you should see this:

How to Renew / Automatically Renew
To renew manually just re-execute the same command when you generate the SSL certificate the first time. Which will prompt you with a chose to regenerate or renew like this:

To renew just select #2 and select 'OK', then restart Nginx web server.
Enjoy FREE SSL from Let's Encrypt
I know I will, I hope this helps somebody.
A BIG Thank You! to Let's Encrypt organization :-)))
Tuesday, March 29, 2016
How to redirect IP address request to the proper domain name using Nginx
For SEO purposes, it is good practice to redirect permanently traffic directed to the IP address of a particular website to be re-written to the actual domain name.
This is very easy to do using Nginx web server. Simply add this server configuration block.
In this example I am using IP address 123.234.123.234 to be 301 redirected to domain name yourdomainname.com.
# -----------------------------------------------------
server {
listen 80;
server_name 123.234.123.234;
return 301 $scheme://www.yourdomainname.com$request_uri;
}
This is very easy to do using Nginx web server. Simply add this server configuration block.
In this example I am using IP address 123.234.123.234 to be 301 redirected to domain name yourdomainname.com.
# -----------------------------------------------------
server {
listen 80;
server_name 123.234.123.234;
return 301 $scheme://www.yourdomainname.com$request_uri;
}
Add simple HTTP Basic Authentication using Nginx
Protecting your website from public using Nginx using Basic HTTP Authentication is easy.
This example uses Nginx + FPM and PHP5This is useful when you just need to have simple protection for the following purposes:
1. During development.
2. Private website.
3. Temporary protection for certain directories.
Where to implement Basic HTTP Authentication in Nginx?
Inside your virtual host / default host configuration file.
In this example I am using Ubuntu and default configuration, so my default host configuration file is located at:
/etc/nginx/sites-available/default
Add the following lines inside the location ~ \.php$ { .... } block.
auth_basic "Restricted";
auth_basic_user_file /etc/nginx/.htpasswd;
My entire location block looks like this:
# pass the PHP scripts to FastCGI server listening on 127.0.0.1:9000
#
location ~ \.php$ {
auth_basic "Restricted";
auth_basic_user_file /etc/nginx/.htpasswd;
fastcgi_buffer_size 128k;
fastcgi_buffers 4 256k;
fastcgi_busy_buffers_size 256k;
fastcgi_split_path_info ^(.+\.php)(/.+)$;
# NOTE: You should have "cgi.fix_pathinfo = 0;" in php.ini
# With php5-cgi alone:
fastcgi_pass 127.0.0.1:9000;
# With php5-fpm:
# fastcgi_pass unix:/var/run/php5-fpm.sock;
fastcgi_index index.php;
include fastcgi_params;
}
How to protect SSL (HTTPS) also with Basic HTTP Authentication in Nginx?
Just repeat the above steps while editing the HTTPS version of the configuration file.In this example I edited:
/etc/nginx/sites-available/default-ssl
Create the .htpasswd (HTTP Password) file
DO NOT place this file inside your document root. I actually place mine in the Nginx configuration directory in:
/etc/nginx
I simply named the file: .htpasswd
it is a . (dot) file because incase you accidentally place it inside your document root, typical web servers will not serve dot files.
Use online HTTP Password generators, just google 'http password generator'.
Here is the content of my .htpasswd file:
username:$apr1$YHsIoLBd$Ut5NoTL7bIIp9ysyLcczn.
the above line will allow username=username with password=password to be authenticated.
/etc/nginx
I simply named the file: .htpasswd
it is a . (dot) file because incase you accidentally place it inside your document root, typical web servers will not serve dot files.
Use online HTTP Password generators, just google 'http password generator'.
Here is the content of my .htpasswd file:
username:$apr1$YHsIoLBd$Ut5NoTL7bIIp9ysyLcczn.
the above line will allow username=username with password=password to be authenticated.
Restart Nginx to apply your configuration
service nginx restart
Sample PHP5 FPM Pool configuration for high volume trafic
PHP5 FPM configuration for high throughput / trafic
I have a web project that required a lot of request per page load. I did not measure it exactly how many request, but it is probably around 50 - 100 requests. And I saw a few request timed-out especially when I cleared my browser cache or during a hard refresh.So I tweaked my FPM pool configuration to the following setting to allow for more throughput:
[yourdotcom]
listen = /var/run/php5-fpm/yourdotcom.socket
listen.backlog = -1
listen.owner = www-data
listen.group = www-data
listen.mode=0660
; Unix user/group of processes
user = www-data
group = www-data
; Choose how the process manager will control the number of child processes.
pm = dynamic
pm.max_children = 80
pm.start_servers = 20
pm.min_spare_servers = 10
pm.max_spare_servers = 40
pm.max_requests = 1000
; Pass environment variables
env[HOSTNAME] = $HOSTNAME
env[PATH] = /usr/local/bin:/usr/bin:/bin
env[TMP] = /tmp
env[TMPDIR] = /tmp
env[TEMP] = /tmp
; host-specific php ini settings here
; php_admin_value[open_basedir] = /var/www/yourdotcom/htdocs:/tmp
Monday, February 22, 2016
Easily rotate Nginx logs using rename, truncate, then restart
The scripts below is probably one of the simplest way to keep a few days worth of logs (up to you) and still keep all logs organized enough without loosing track.
What the scripts below do:
1. change directory to /log/nginx (this is where I keep my Nginx logs - yours may be different)
2. move (rename) a log file ie: access.log to access_YYYYMMDD.log
3. create a new log file (using touch) with zero bytes.
4. change permission of new log file to 777 (allow everything).
5. restart nginx process so that it will use newly created log files.
-----------------------------------------------
cd /log/nginx
mv access.log access_`date +"%Y%m%d"`.log
touch /log/nginx/access.log
chmod 777 /log/nginx/access.log
mv error.log error_`date +"%Y%m%d"`.log
touch /log/nginx/error.log
chmod 777 /log/nginx/error.log
mv api-access.log api-access_`date +"%Y%m%d"`.log
touch /log/nginx/api-access.log
chmod 777 /log/nginx/api-access.log
mv api-error.log api-error_`date +"%Y%m%d"`.log
touch /log/nginx/api-error.log
chmod 777 /log/nginx/api-error.log
mv default-access.log default-access_`date +"%Y%m%d"`.log
touch /log/nginx/default-access.log
chmod 777 /log/nginx/default-access.log
mv default-error.log default-error_`date +"%Y%m%d"`.log
touch /log/nginx/default-error.log
chmod 777 /log/nginx/default-error.log
mv default-ssl-access.log default-ssl-access_`date +"%Y%m%d"`.log
touch /log/nginx/default-ssl-access.log
chmod 777 /log/nginx/default-ssl-access.log
mv default-ssl-error.log default-ssl-error_`date +"%Y%m%d"`.log
touch /log/nginx/default-ssl-error.log
chmod 777 /log/nginx/default-ssl-error.log
mv rockmongo-access.log rockmongo-access_`date +"%Y%m%d"`.log
touch /log/nginx/rockmongo-access.log
chmod 777 /log/nginx/rockmongo-access.log
mv rockmongo-error.log rockmongo-error_`date +"%Y%m%d"`.log
touch /log/nginx/rockmongo-error.log
chmod 777 /log/nginx/rockmongo-error.log
-----------------------------------------------
What to do with all those files created with YYYYMMDD?
Well you can then remove them using the following crontab lines at your liking:
here is a line from my crontab that removes every file in my /log/ directory recursive that is older than 10 days:
19 4 * * * find /log/ -type f -mtime +10 | xargs rm
What to do with all those files created with YYYYMMDD?
Well you can then remove them using the following crontab lines at your liking:
here is a line from my crontab that removes every file in my /log/ directory recursive that is older than 10 days:
19 4 * * * find /log/ -type f -mtime +10 | xargs rm
Sunday, February 7, 2016
My most up to date PHP development stack
A few people have asked me about which development tools, libraries, and technologies I am using. I want to create this blog to help current and new PHP developers get up to speed and hopefully not spend as much time as I had trying out different tools (or worst wrong tools) :-)
Computer:
In 2015 I ditched my Mac Pro for a Macbook Pro and good thunderbolt dock that can drive my 4K monitor. I did this so that I can be mobile and most importantly so that I do not sit on my a** all day.
Yes, sorry I do not recommend Windows, for web development (PHP, Python, Ruby, etc... ) Macs are much better choice.
Text Editor:
Sublime Text 3
Server OS:
Ubuntu LTS versions, currently 14.04
Web Server:
Nginx + FPM
Database Server:
MongoDB + ElasticSearch
I have developed my own DB framework which utilizes Redis > MongoDB > ElasticSearch all together in harmony.
PHP Framework:
Laravel + Composer
I used to be a code igniter fan, however Laravel is king today.
(Node JS sometime)
Javascript:
jQuery + Angular
HTML:
Bootstrap 3.x
I waited too long to jumped to Laravel.
In 2015, I have been blessed with TONS of work, so much work that I have not had a chance to re-factor my base codes to Laravel. I wish I would have switch since version 4. Anyways... make sure you checkout Laravel, it is almost as good as the next 'daily bread' for PHP.
I hope this article help someone new or even PHP veterans to compare with tools they are using.
Sunday, February 8, 2015
Truncate and rotate linux server log files using copy, truncate and restart gracefully
If you are not using auto-rotate of log files for certain daemons in your linux server, you may be looking for a solution to auto-rotate your log files.
Rotating a log file is necessary so that your log file will not be too big.
When log files gets too big, it has bitten me in the a** before. Server runs out of disk space
and server process fails. Yes it is an embarrassing situation for any server admin. Save yourself the embarrassment and spent 5 minutes implementing this simple rotate script:
The code above will do the following:
find /data/log/tmp_nginx_log -type f -mtime +3 | xargs rm
The command above will remove any files older than 3 days from /data/log/tmp_nginx_log directory.
For more options you can do to clean up files, read my blog about how to Remove Files in Directory Recursively.
Rotating a log file is necessary so that your log file will not be too big.
When log files gets too big, it has bitten me in the a** before. Server runs out of disk space
and server process fails. Yes it is an embarrassing situation for any server admin. Save yourself the embarrassment and spent 5 minutes implementing this simple rotate script:
cp /var/log/nginx/error.log /data/log/tmp_nginx_log/nginx_error_`date +"%Y_%m_%d"`.log; truncate -s0 /var/log/nginx/error.log; kill -USR1 $( cat /var/run/nginx.pid )
The code above will do the following:
- copy the current log file from /var/log/nginx/error.log to /data/log/tmp_nginx_log/
while copying, it will also rename the file by appending specific date to it. - next, it will truncate the current log file to zero size.
- finally, it will send message to nginx web server to reload gracefully and it will start logging errors into the new zero sized log file.
So now that we moved the log file to another directory what do we do with it there?
Since we named all files with their appropriate dates, we can easily review individual log files when we need too.
Another purpose for separating the log files into separate dates, is so that we can clean-up old log files we no longer want. For example if you want to only keep log files for 30 days, you can easily run the following command or schedule in your crontab.
find /data/log/tmp_nginx_log -type f -mtime +3 | xargs rm
The command above will remove any files older than 3 days from /data/log/tmp_nginx_log directory.
For more options you can do to clean up files, read my blog about how to Remove Files in Directory Recursively.
Sunday, February 1, 2015
Compiling and installing Nginx 1.4.4 from scratch
wget http://nginx.org/download/nginx-1.4.4.tar.gz
tar -zvxf nginx-1.4.4.tar.gz
cd nginx-1.4.4
./configure \
--with-http_ssl_module \
--with-http_realip_module \
--with-http_addition_module \
--with-http_sub_module \
--with-http_dav_module \
--with-http_flv_module \
--with-http_mp4_module \
--with-http_gunzip_module \
--with-http_gzip_static_module \
--with-http_random_index_module \
--with-http_secure_link_module \
--with-http_stub_status_module \
--with-mail \
--with-mail_ssl_module \
--with-file-aio \
--with-ipv6
make
make install
tar -zvxf nginx-1.4.4.tar.gz
cd nginx-1.4.4
./configure \
--with-http_ssl_module \
--with-http_realip_module \
--with-http_addition_module \
--with-http_sub_module \
--with-http_dav_module \
--with-http_flv_module \
--with-http_mp4_module \
--with-http_gunzip_module \
--with-http_gzip_static_module \
--with-http_random_index_module \
--with-http_secure_link_module \
--with-http_stub_status_module \
--with-mail \
--with-mail_ssl_module \
--with-file-aio \
--with-ipv6
make
make install
GZIP setting for NGINX that I recommend to use
 ##
 # Gzip Settings
 ##

 gzip on;
 gzip_disable "msie6";
 gzip_comp_level 6;
 gzip_buffers 16 8k;
 gzip_vary on;
 gzip_proxied any;
 gzip_types text/plain text/
Generate self signed self-signed signing certificate
Step 1 : Generate Secure Key
openssl genrsa -des3 -out <your_domain_name>.key 2048
Step 2 : Generate Insecure Key
openssl rsa -in <your_domain_name>.key -out <your_domain_name>.key.insecure
mv <your_domain_name>.key <your_domain_name>.key.secure
mv <your_domain_name>.key.insecure <your_domain_name>.key
Step 3 : Generate CSR (certificate request)
openssl req -new -key <your_domain_name>.key -out <your_domain_name>.csr
Step 4 : Generate Certificate
openssl x509 -req -days 365 -in <your_domain_name>.csr -signkey <your_domain_name>.key -out <your_domain_name>.crt
Tip:
It is good practice to store your keys (.key.insecure) & (.key) in separate directory from your certificate files. For example if you are using Debian I recommend storing your keys in /etc/private/ssl directory.
Combining SSL certificates from Comodo Positive SSL for NGINX
Here is a quick and easy way to combine Comodo's Positive SSL Certificate.
I bought my certificate from NameCheap for about $9.95 / year.
This post will only describe the process of combining the certificate. I assume you already:
1. Generate CSR and .key file
2. Submit CSR to Comodo / Namecheap
3. Got an email from Comodo containing .crt file
If you have not done any of the task above, please do them first before following this guide.
The following configuration is what I use to enable SSL on my NGINX configuration. I have tweaked this configuration overtime and this is my latest one. It enables TLS and prevent SSLv2 and SSLv3 from being used because they are weak and vulnerable. I also included configuration to disable weak ciphers.
service nginx restart
I bought my certificate from NameCheap for about $9.95 / year.
This post will only describe the process of combining the certificate. I assume you already:
1. Generate CSR and .key file
2. Submit CSR to Comodo / Namecheap
3. Got an email from Comodo containing .crt file
If you have not done any of the task above, please do them first before following this guide.
[STEP 1] Confirm and Extract all files received from Comodo:
Attached to this email you should find a .zip file containing:- Root CA Certificate - AddTrustExternalCARoot.crt
- Intermediate CA Certificate - COMODORSAAddTrustCA.crt
- Intermediate CA Certificate - COMODORSADomainValidationSecureServerCA.crt
- Your PositiveSSL Certificate - <YOUR_DOMAIN_NAME>_com.crt
[STEP 2] Make sure all files are inside one directory.
Copy / move all files into one directory.
[STEP 3] Combine them!
From your linux server command line, execute:cat <YOUR_DOMAIN_NAME>_com.crt COMODORSADomainValidationSecureServerCA.crt COMODORSAAddTrustCA.crt AddTrustExternalCARoot.crt > <YOUR_DOMAIN_NAME>_combined.crt
[STEP 4] Edit your nginx /etc/sites-available/<your_file>
The following configuration is what I use to enable SSL on my NGINX configuration. I have tweaked this configuration overtime and this is my latest one. It enables TLS and prevent SSLv2 and SSLv3 from being used because they are weak and vulnerable. I also included configuration to disable weak ciphers.
ssl on;
ssl_certificate /etc/ssl/<YOUR_DOMAIN_NAME>/<YOUR_DOMAIN_NAME>_combined.crt;
ssl_certificate_key /etc/ssl/private/<YOUR_DOMAIN_NAME>.key;

ssl_session_timeout 5m;

#enables all versions of TLS, but not SSLv2 or 3 which are weak and now deprecated.
ssl_protocols TLSv1 TLSv1.1 TLSv1.2;

#Disables all weak ciphers
ssl_ciphers "ECDHE-RSA-AES256-GCM-SHA384:ECDHE-RSA-AES128-GCM-SHA256:DHE-RSA-AES256-GCM-SHA384:DHE-RSA-AES128-GCM-SHA256:ECDHE-RSA-AES256-SHA384:ECDHE-RSA-AES128-SHA256:ECDHE-RSA-AES256-SHA:ECDHE-RSA-AES128-SHA:DHE-RSA-AES256-SHA256:DHE-RSA-AES128-SHA256:DHE-RSA-AES256-SHA:DHE-RSA-AES128-SHA:ECDHE-RSA-DES-CBC3-SHA:EDH-RSA-DES-CBC3-SHA:AES256-GCM-SHA384:AES128-GCM-SHA256:AES256-SHA256:AES128-SHA256:AES256-SHA:AES128-SHA:DES-CBC3-SHA:HIGH:!aNULL:!eNULL:!EXPORT:!DES:!MD5:!PSK:!RC4";

ssl_prefer_server_ciphers on;
[STEP 5] Restart NGINX
service nginx restart
Monday, September 29, 2014
AlphaSSL Wildcard Installation into Nginx SHA-256 (September 29, 2014)
How To Install AlphaSSL Wildcard for NGINX web server
Surprisingly the process of installing my AlphaSSL Wildcard certificate was very easy.
Here are the instructions:
1. Locate your AlphaSSL Wildcard certificate you received via e-mail from AlphaSSL:

2. Locate the AlphaSSL Intermediate Certificate (choose after 3/2014 SHA-256) (should be the default):

3. Combine your Wildcard Certificate + Intermediate Certificate into one file:
Create a new 'text file' name it:
whatever_your_domain-alphassl-wildcard-YYYYMMDD.crt
in your favorite text-editor. Copy and paste AlphaSSL Wildcard Certificate from Step 1 first, then paste the Immediate Certificate from Step 2. It should look like this:

Your Wildcard Certificate on TOP and the Intermediate at the BOTTOM.
Copy this file 'whatever_your_domain-alphassl-wildcard-YYYYMMDD.crt' and your certificate key file into your private SSL directory. I am using Ubuntu Server and it is located in /etc/nginx/ssl.
4. Change you Nginx virtual host configuration:
ssl on;
ssl_certificate /etc/nginx/ssl/whatever_your_domain-alphassl-wildcard-YYYYMMDD.crt;
ssl_certificate_key /etc/nginx/ssl/whatever_your_domain-alphassl-wildcard.key;
5. Restart NGINX web server:
service nginx restart
* Stopping Nginx Server... [ OK ]
* Starting Nginx Server... [ OK ]

6. TEST!
When successful you should see something like this (when clicking on the pad lock icon):

Subscribe to:
Posts (Atom)